Strawberry Crunch Cheesecake Cones Recipe
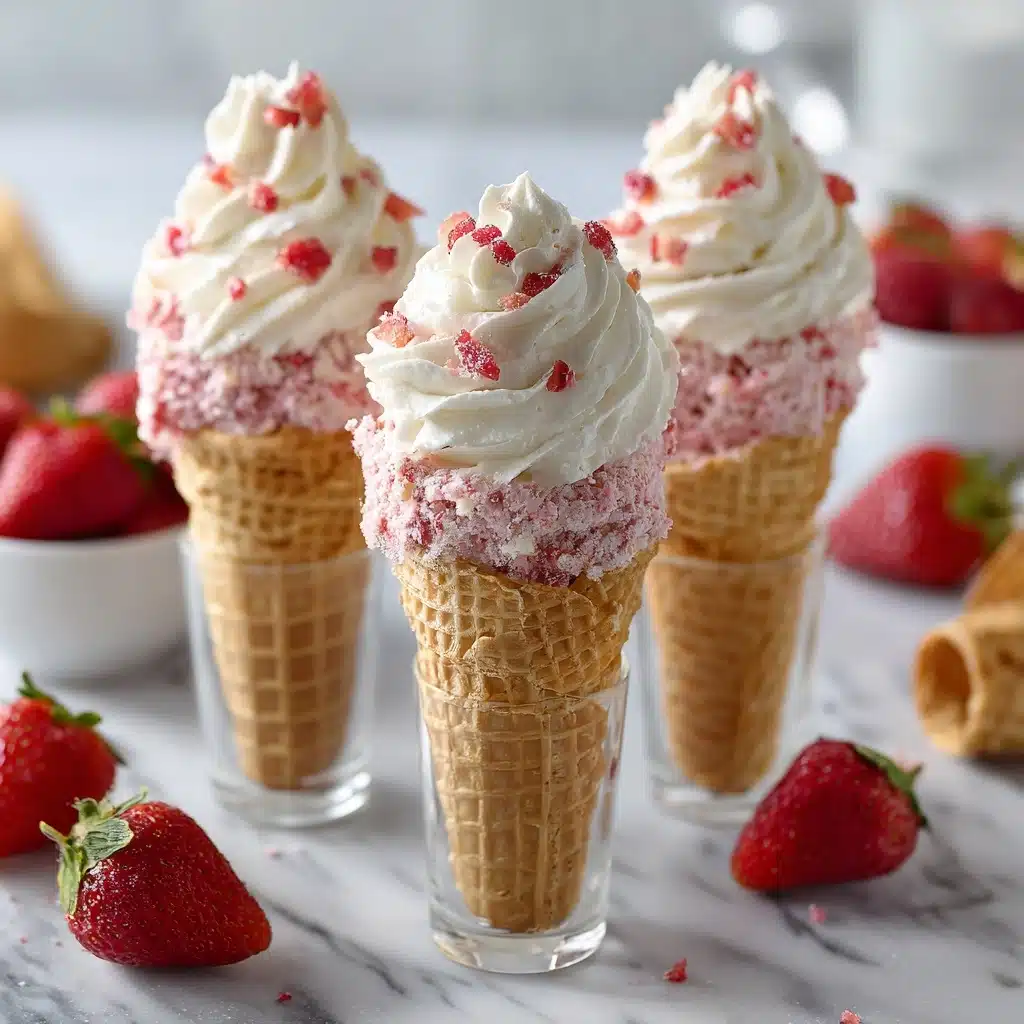
If you love the flavors of classic strawberry crunch cheesecake and crave something a little more playful and portable, Strawberry Crunch Cheesecake Cones are your newest obsession! These beauties feature silky cheesecake filling piped into crisp, chocolate-dipped cones, each one dressed in vibrant strawberry crunch and topped with juicy bursts of fresh berries. They’re a showstopper for parties, picnics, or just treating yourself, bringing all the nostalgia of an ice cream shop with a seriously irresistible upgrade.

Ingredients You’ll Need
This recipe is blissfully straightforward, but each component is essential in rounding out the flavor, color, and irresistible texture of your Strawberry Crunch Cheesecake Cones! Use the best-quality ingredients you can find for the dreamiest results.
- Full fat cream cheese (3.5oz / 100g): Delivers rich, smooth creaminess; don’t use low-fat versions if you want the classic cheesecake flavor.
- Powdered sugar (¼ cup/30g + 1 tbsp/6g): Sweetens both the base and the whipped cream while dissolving seamlessly for a silky finish.
- Heavy whipping cream (½ cup/125ml): Creates the luscious, airy texture that makes the filling light and mousse-like.
- Vanilla (1 teaspoon): One little spoon of vanilla ties together all the creamy, fruity notes beautifully.
- White chocolate (1.8oz/50g), chopped: Provides a decadent shell for the cones, acting as “glue” for the crunchy topping.
- Sugar cones (6-7): Add a delightfully crisp, sweet crunch and make these treats perfectly portable.
- Strawberry crunch topping (½-1 cup): The key to that iconic strawberry crunch flavor and color—store-bought or homemade works wonderfully.
- Fresh strawberries, chopped (6-7): Bursts of brightness and freshness on top to finish each cone in fruity style.
How to Make Strawberry Crunch Cheesecake Cones
Step 1: Make the Cream Cheese Base
Start by beating the full fat cream cheese with ¼ cup powdered sugar until velvety-smooth and free of lumps. It’ll take a few minutes and a bit of elbow grease if doing it by hand, but you want a perfectly creamy base that will melt in your mouth. Once it’s silky, set it aside while you whip up the next layer.
Step 2: Whip the Cream
In a separate bowl, combine the heavy whipping cream, 1 tablespoon powdered sugar, and vanilla. Beat these together until you reach stiff peaks—the mixture should hold its shape when you lift the beaters, creating a fluffy foundation for your cheesecake filling. Don’t overmix or the cream will turn grainy, but don’t stop too soon or you’ll lose that essential airy texture.
Step 3: Fold and Chill the Filling
Gently fold the whipped cream mixture into your smooth cream cheese. Take your time and use a spatula with light strokes—this keeps the filling fluffy and luxurious. When everything looks combined and cloud-like, refrigerate it for at least an hour. Chilling allows the flavors to meld and firms up the filling so it pipes beautifully into your cones.
Step 4: Dip the Cones in White Chocolate
While the cheesecake filling chills, melt your white chocolate. You can do this in short bursts in the microwave or over a double boiler for more control. Dip the top of each sugar cone into the melted chocolate, letting any excess drip off. The chocolate will act as your “glue” for the strawberry crunch topping and creates a fun textural contrast—that little snap as you bite in is irresistible!
Step 5: Coat the Cones with Strawberry Crunch
Pour some strawberry crunch topping into a bowl or a shallow dish. Roll or spoon the crunchy bits over the melted chocolate-dipped part of each cone, covering all sides generously for that beautiful look and classic flavor. Then, let the cones rest upside-down in the dish about 5-10 minutes, so the chocolate sets and the topping sticks perfectly.
Step 6: Fill and Top Your Cones
Once the cones are set and your filling is well chilled, transfer that luscious cheesecake mixture into a piping bag (a sturdy zip-top bag with the corner snipped off works too). Pipe the filling generously into each cone, piling it high. Top with plenty of the chopped fresh strawberries for juicy bursts of color and flavor with every bite. Serve them right away for best results—they’re freshest and crispiest in the first hour!
How to Serve Strawberry Crunch Cheesecake Cones
Garnishes
For some extra flair, garnish each cone with a few more strawberry pieces, a dusting of powdered sugar, or even a drizzle of melted white chocolate. A tiny mint leaf on top adds a touch of green and elegance, turning your Strawberry Crunch Cheesecake Cones into little works of art!
Side Dishes
Pair these cones with a refreshing fruit salad, a tangy lemonade, or even a scoop of vanilla ice cream for an over-the-top dessert platter. For parties, serve the cones alongside a board of other hand-held sweets to create a whimsical dessert buffet that everyone will remember.
Creative Ways to Present
Stand your filled Strawberry Crunch Cheesecake Cones upright in a mason jar, a tall glass filled with dried beans or sugar, or even a styrofoam cone lined with parchment for dramatic height. You can also nestle them in decorative cupcake liners, which makes them easy to pass at picnics and parties—kids and adults alike will swoon!
Make Ahead and Storage
Storing Leftovers
If you end up with leftover cones (a rare occurrence, but possible), place them upright in an airtight container in the fridge for up to 24 hours. The cones may soften a bit over time but will still taste delightful. Alternatively, keep the filling and the cones separate and assemble just before serving for maximum crunch.
Freezing
While the filled cones are best enjoyed fresh, you can freeze the cheesecake filling by itself for up to a month—just transfer it to a freezer-safe bag. Defrost overnight in the refrigerator and re-whip for a fluffier texture before filling your cones. The cones themselves aren’t ideal for freezing as they’ll lose their crunch, so always assemble the Strawberry Crunch Cheesecake Cones right before enjoying.
Reheating
No reheating required—these cones are meant to be enjoyed cold and creamy, straight from the fridge! If your filling has chilled for a while and firmed up, let it sit out for just a few minutes at room temperature to soften slightly before serving.
FAQs
Can I use low-fat cream cheese?
Full fat cream cheese gives the richest flavor and creamiest texture for Strawberry Crunch Cheesecake Cones. You can swap in low-fat cream cheese, but the filling may be a bit less decadent and not set up as firmly.
What is strawberry crunch topping made of?
Strawberry crunch topping is usually a mix of crushed cookies (like Golden Oreos), freeze-dried strawberries, and sometimes a little melted butter. You can make your own or use a pre-made version for convenience—either way, it brings the nostalgic crunch and vibrant color!
Do I have to use a piping bag?
No piping bag? No problem! You can use a zip-top bag with a corner snipped off, or even spoon the filling into the cones. Using a bag just gives you those pretty, bakery-style swirls.
How do I keep the cones from getting soggy?
The chocolate coating acts as a barrier to keep the cones crisp, but they’re at their best when eaten soon after assembling. If you want to prep ahead, store the cones and filling separately and fill just before serving.
Can I make these with other fruits?
Absolutely! Try swapping the fresh strawberries for raspberries or mixed berries for a fun twist. Even a drizzle of caramel or a sprinkle of crushed pistachios on top would make these Strawberry Crunch Cheesecake Cones extra special.
Final Thoughts
There’s something so joyful about sharing these Strawberry Crunch Cheesecake Cones—each bite bursts with creamy, fruity, and crunchy goodness! Once you make them, they’ll quickly become a requested treat for gatherings and family celebrations, so grab your favorite people (and a few cones) and give this playful dessert a try. Happy creating!
Print
Strawberry Crunch Cheesecake Cones Recipe
- Total Time: 1 hour 30 minutes
- Yield: 6–7 cones 1x
- Diet: Vegetarian
Description
These Strawberry Crunch Cheesecake Cones are a delightful twist on traditional cheesecake, with a crunchy strawberry topping and fresh fruit garnish, all served in a convenient cone for a fun and tasty treat.
Ingredients
Cheesecake Filling:
- 3.5oz / 100g full fat cream cheese
- ¼ cup (30g) +1 tablespoon (6g) powdered sugar
- ½ cup (125ml) heavy whipping cream
- 1 teaspoon vanilla
- 1.8oz / 50g white chocolate, chopped
Additional Ingredients:
- 6–7 sugar cones
- ½–1 cup strawberry crunch topping
- 6–7 fresh strawberries, chopped
Instructions
- Prepare Cheesecake Filling: Beat the cream cheese with ¼ cup powdered sugar until smooth. Set aside.
- Whip Cream: Whip heavy cream with 1 tablespoon powdered sugar and vanilla until stiff peaks form.
- Combine Mixtures: Fold whipped cream into cheese mixture. Refrigerate for 1 hour.
- Melt White Chocolate: Melt white chocolate and dip cones in it.
- Coat Cones: Coat cones in strawberry crunch topping. Let dry.
- Fill Cones: Pipe cheesecake filling into cones. Top with chopped strawberries.
- Serve: Enjoy immediately!
Notes
- You can customize the toppings with other fruits or nuts for variety.
- Ensure the cones are fully coated in the chocolate and topping for the best crunch.
- Prep Time: 20 minutes
- Cook Time: 10 minutes
- Category: Dessert
- Method: Mixing, Whipping, Melting
- Cuisine: American
Nutrition
- Serving Size: 1 cone
- Calories: 220
- Sugar: 12g
- Sodium: 90mg
- Fat: 15g
- Saturated Fat: 9g
- Unsaturated Fat: 4g
- Trans Fat: 0g
- Carbohydrates: 20g
- Fiber: 1g
- Protein: 3g
- Cholesterol: 35mg
Keywords: Strawberry Crunch Cheesecake Cones, Cheesecake Cones, Strawberry Crunch, Dessert, Summer Treat

