
Best Witch Hat Halloween Cookies Recipe
Introduction
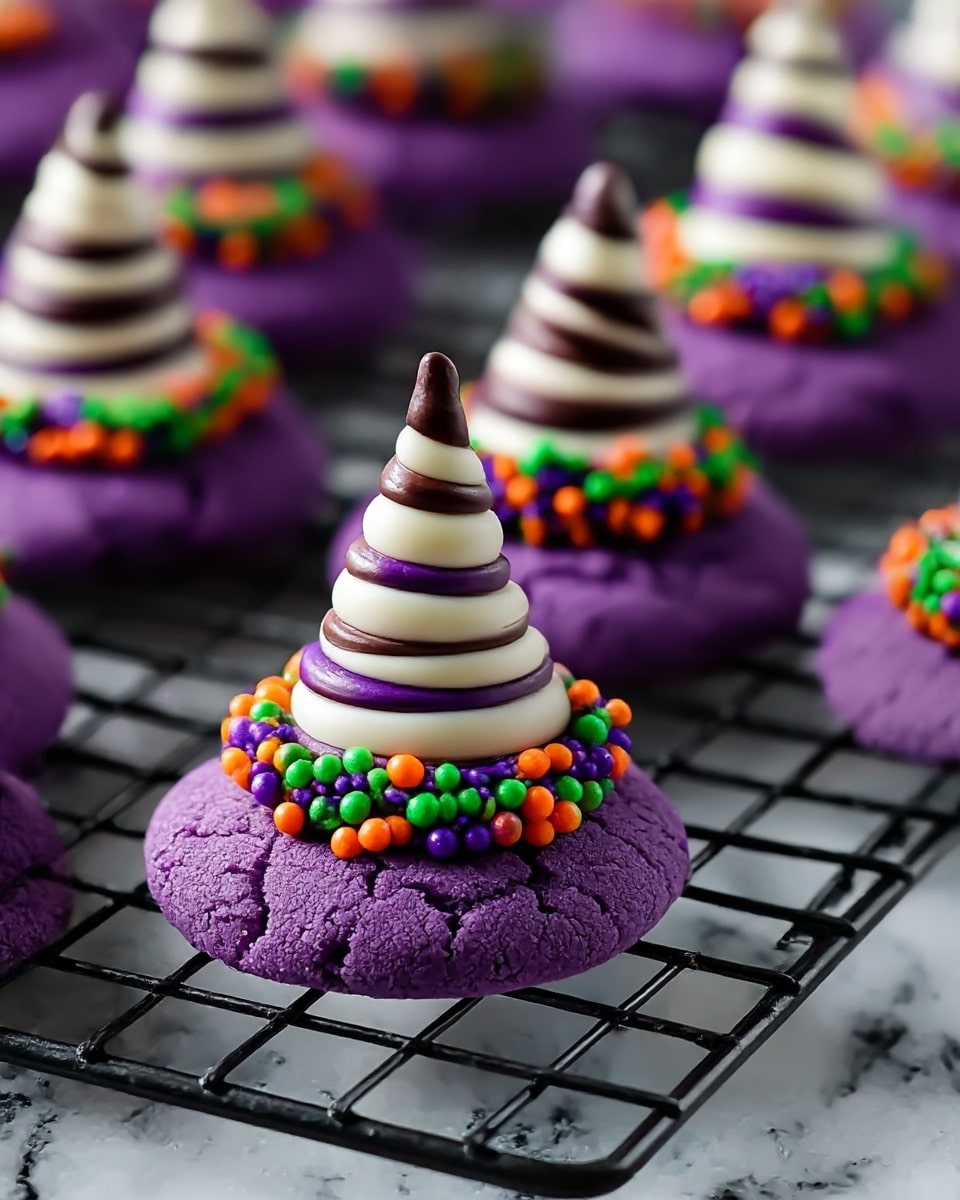
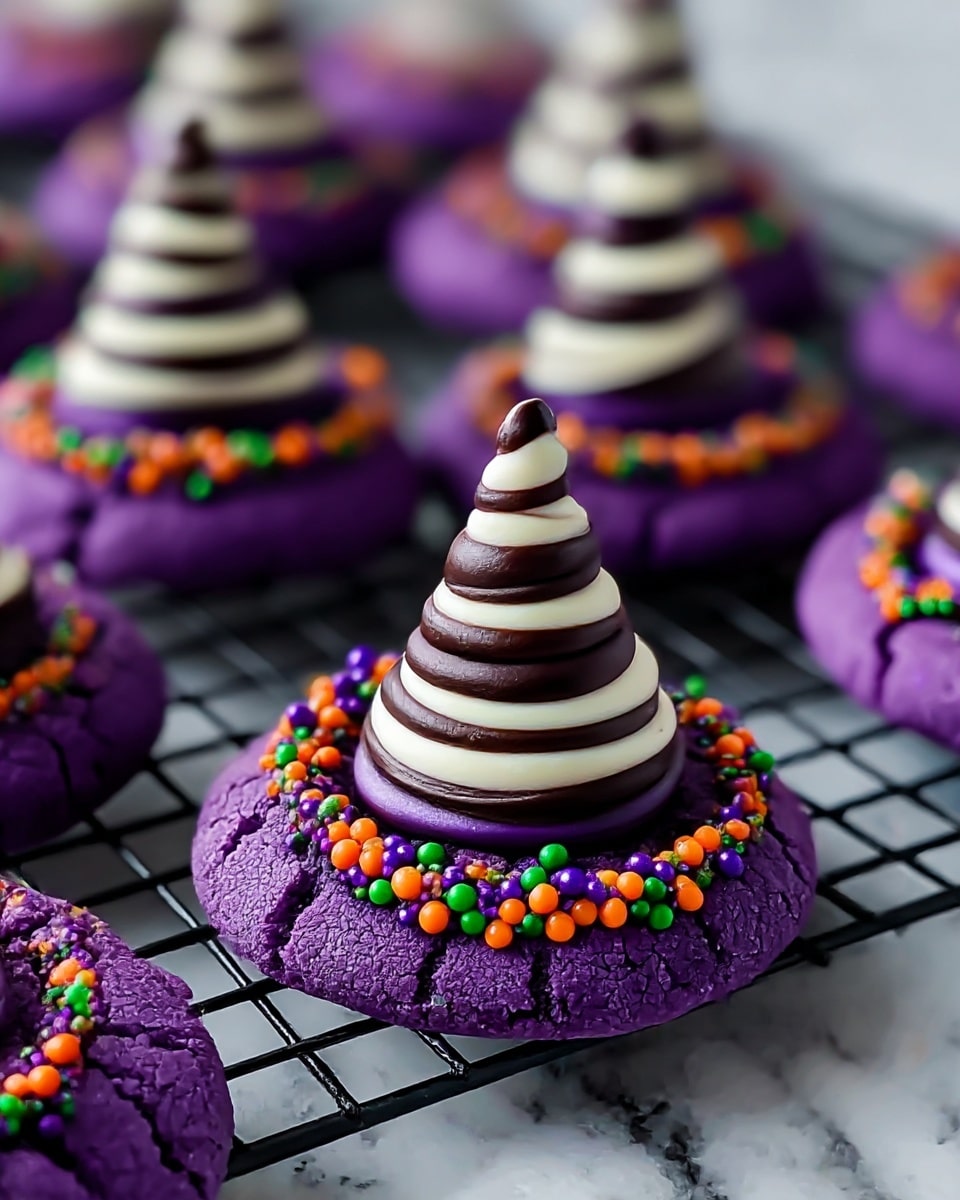
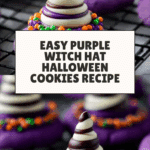
These Best Witch Hat Halloween Cookies are a fun and festive treat perfect for spooky celebrations. With a soft peanut butter base, purple coloring, and a chocolate kiss peak, they bring a whimsical touch to any Halloween gathering.
Ingredients
- 1 1/2 cups all-purpose flour
- 2 tsp cornstarch
- 1/2 tsp baking soda
- 1/4 tsp baking powder
- 1/8 tsp fine sea salt
- 1/2 cup unsalted butter, softened
- 1 cup white sugar
- 1 large egg
- 3/4 cup smooth peanut butter
- 1 tsp vanilla extract
- Purple gel food coloring
- Halloween sprinkles or purple sanding sugar (for decorating)
- 33 chocolate kisses or Hugs candies, unwrapped
Instructions
- Step 1: Line a sheet tray with parchment paper. In a large bowl, whisk together the flour, cornstarch, baking soda, baking powder, and sea salt until evenly combined. Set aside.
- Step 2: In a separate large bowl, cream the softened butter and sugar using an electric mixer for 2 minutes until light and fluffy. Mix in the egg until fully incorporated.
- Step 3: Add the peanut butter and vanilla extract to the wet mixture, mixing well and scraping down the sides as needed.
- Step 4: Gradually add the dry ingredients from Step 1 to the wet mixture. Stir until a uniform dough forms. Incorporate purple gel food coloring a little at a time until the desired shade is reached, finishing by hand to ensure even color.
- Step 5: Using a 1-tablespoon cookie scoop, portion dough into mounds and place them close together but not touching on the prepared tray. Cover with plastic wrap and chill in the fridge for at least 2 hours or overnight.
- Step 6: Preheat the oven to 350°F (175°C) and line new sheet trays with parchment paper. Place Halloween sprinkles or sanding sugar in a small bowl. Roll each chilled dough mound into a smooth ball and coat completely by rolling in the sprinkles or sugar. Arrange balls 2 inches apart on trays.
- Step 7: Bake for 9–11 minutes until cookies are puffed and beginning to crack. For a soft interior, slightly underbake as cookies will continue to set while cooling.
- Step 8: Let cookies cool on the tray for 5 minutes. While warm, gently press a chocolate kiss or Hug candy into the center of each cookie. Immediately transfer the tray to the freezer for 10 minutes to prevent melting.
- Step 9: After chilling, transfer cookies to a wire rack to finish cooling and bake the remaining dough as needed.
Tips & Variations
- For a nut-free version, substitute peanut butter with sunflower seed butter.
- Adjust the amount of purple food coloring gradually to reach your preferred shade without affecting dough texture.
- Use festive Halloween sprinkles like bats or pumpkins for a more colorful decoration.
- Chilling the dough overnight intensifies flavor and ensures thicker cookies.
Storage
Store cookies in an airtight container at room temperature for up to 5 days. To keep the chocolate kisses intact, avoid stacking cookies. Reheat gently in a warm oven if desired, but avoid microwave reheating to prevent melting the chocolate prematurely.
How to Serve
Serve this delicious recipe with your favorite sides.
FAQs
Can I use other types of chocolate instead of kisses?
Yes, small chocolate candies or mini chocolate chips can be used, but kisses work best for the signature witch hat shape and hold up well when pressed into warm cookies.
Why is chilling the dough important?
Chilling solidifies the fats in the dough, helping the cookies hold their shape and preventing excessive spreading during baking. It also enhances flavor and texture.
Print
Best Witch Hat Halloween Cookies Recipe
- Total Time: 2 hours 25 minutes
- Yield: 33 cookies 1x
Description
Celebrate Halloween with these delightful Best Witch Hat Halloween Cookies. These festive cookies feature a soft, peanut butter-infused base tinted with purple gel food coloring, coated in spooky sprinkles, and topped with classic chocolate kisses to resemble witch hats. Perfect for parties and trick-or-treaters, these cookies are as fun to make as they are to eat.
Ingredients
For the Cookie Dough:
- 1 1/2 cups all-purpose flour
- 2 tsp cornstarch
- 1/2 tsp baking soda
- 1/4 tsp baking powder
- 1/8 tsp fine sea salt
- 1/2 cup unsalted butter, softened
- 1 cup white sugar
- 1 large egg
- 3/4 cup smooth peanut butter
- 1 tsp vanilla extract
- Purple gel food coloring, as needed
For Decorating:
- Halloween sprinkles or purple sanding sugar
- 33 chocolate kisses or hugs candies, unwrapped
Instructions
- Prepare the Baking Equipment and Dry Ingredients: Line a sheet tray with parchment paper. In a large bowl, whisk together the 1 1/2 cups all-purpose flour, 2 tsp cornstarch, 1/2 tsp baking soda, 1/4 tsp baking powder, and 1/8 tsp fine sea salt until evenly combined. Set aside.
- Make the Wet Cookie Dough Base: In another large bowl, cream 1/2 cup softened unsalted butter and 1 cup white sugar with an electric mixer for 2 minutes until light and fluffy. Mix in 1 large egg until fully incorporated. Add 3/4 cup smooth peanut butter and 1 tsp vanilla extract, mixing well and scraping down the bowl as needed.
- Combine Wet and Dry Ingredients and Add Coloring: Add the dry ingredients to the wet mixture and stir until a uniform dough forms. Gradually add purple gel food coloring, mixing thoroughly by hand to ensure an even purple color without streaks.
- Portion, Chill, and Prepare for Baking: Using a 1-tablespoon cookie scoop, portion dough into mounds and place them close together (not touching) on the parchment-lined sheet tray. Cover with plastic wrap and chill in the fridge for at least 2 hours or overnight for best texture to prevent spreading during baking.
- Coat, Bake, and Decorate the Cookies: Preheat the oven to 350°F (175°C) and line new sheet trays with parchment paper. Pour Halloween sprinkles or purple sanding sugar into a small bowl. Roll each chilled dough mound into a smooth ball, then roll it in the sprinkles or sanding sugar. Arrange balls 2 inches apart on prepared trays. Bake for 9–11 minutes until cookies puff up and begin to crack, slightly underbaking for a soft center.
- Add Chocolate Kisses and Cool: Remove cookies from the oven and let cool on the tray for 5 minutes. While warm, gently press an unwrapped chocolate kiss or Hug candy into the center of each cookie so it sticks. Immediately transfer the tray to the freezer for 10 minutes to set the chocolate without melting. After chilling, transfer cookies to a wire rack to finish cooling completely before serving.
Notes
- Chilling the dough is essential for cookies to bake thick and prevent spreading.
- Undercooking slightly ensures a soft interior as cookies continue to set while cooling.
- You can substitute peanut butter with another nut butter if needed, but this will alter the flavor and texture slightly.
- Use fresh purple gel food coloring for vibrant, even coloring.
- Freezing the cookies immediately after adding chocolates prevents melting and keeps the hat shape intact.
- Prep Time: 15 minutes
- Cook Time: 10 minutes
- Category: Dessert
- Method: Baking
- Cuisine: American
Keywords: Halloween cookies, witch hat cookies, peanut butter cookies, festive Halloween treats, chocolate kiss cookies